 About ChromX
I have compiled Chromium OS from source. Just for fun. Chromium OS is an open-source project that aims to build an operating system that provides a fast, simple, and more secure computing experience for people who spend most of their time on the web. My Chromium OS Build 160525 is for all 64 bit “normal” Desktop computers and laptops. If you have unusual hardware you could check out ArnoldTheBat’s special Chromium OS builds.
How do I run Chromium OS?
Normally you run Chromium OS from a USB stick, but the system can also be installed to hard drive. Could be useful if you want to bring new life to an old computer. Be aware of the fact that Chromium OS can’t be installed together with other Linux systems (or any other OS). It will “take” the whole disk.
The difference between Chromium OS and Google Chrome OS
Chromium OS is the open source project, used primarily by developers, with code that is available for anyone to checkout, modify, and build.
Google Chrome OS is the Google product that OEMs ship on Chromebooks for general consumer use.
Used kernel
4.4.4
Install my Build 160525 to a USB stick of at least 6 GB
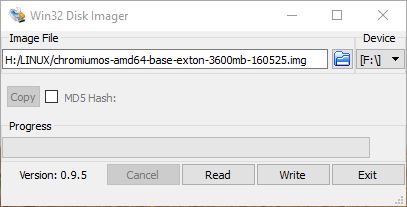
A. In Windows you can use Win32DiskImager. It will look like this. (Unzip chromiumos-amd64-base-exton-454mb-160525.zip first).
B. In Windows you can also use an app (Chromebook Recovery Utility) in Google Chrome. Do it like this.
1. Start by downloading your Chromium OS (chromiumos-amd64-base-exton-454mb-160525.zip) installation file. Do not unzip the file, this may cause issues with the USB creation process.
2. Open the Chrome web browser and install the Chromebook Recovery Utility plug-in from the Google Chrome Web Store. To install it, visit the link and click “Add to Chrome.”
3. After the plug-in has installed, click “Launch” from the Web Store page to open the Chromebook Recovery Utility.
4. In the Recovery Utility, click the gear icon on the upper right-hand side and select “Use Local Image”.
5. Find and select the chromiumos-amd64-base-exton-454mb-160525.zip file that you located in Step 1.
6. When prompted, insert an 8 or 16 GB USB device that you want to turn into a Chromium OS installer. Make sure it has no important files on it, as it will be completely erased. Select your USB drive from the drop-down menu and click “Continue” and then “Create Now.”
7. The process of creating your Chromium OS USB installer will take around 20 minutes. Some Windows installations may display a security prompt, click “allow” to let the process proceed. Note: The progress bar in the Chrome Recovery Utility may go over 100% and show incorrect time estimates. This is not a problem.
8. When the process has completed you will see a green check box – you can now remove your Chromium OS USB installer and use it! You can create as many additional USB installers as you want using the process above.
USB installation in Linux
In Linux you shall open up a terminal and run this command: sudo dd if=chromiumos-amd64-base-exton-3600mb-160525.img of=/dev/sdX bs=4M
(You shall of course replace /dev/sdX with for example /dev/sdb or /dev/sdc. Check it carefully before you run the above command).
Notes about USB sticks
It appears that not all USB sticks are suitable for topical purposes. I.e. they can not be made bootable. I myself have experience of brands Kingston DataTraveler, SanDisk Ultra USB 3.0, SanDisk Extreme USB 3.0 and Sony Micro Vault. The first three works (for me). You shall not use USB sticks of older model. They may work, but mostly bad. If you – after the installation of Chromium OS to the USB stick – get different error messages when you try to run the system from the stick it is often because the stick is not “good enough”.
Install to hard drive
If you want to install the system to your hard drive, follow the instructions here and here. Beware of the warnings noted in the links! When prompted for a password for the chronos user, use “exton” (without the quotes!).
USB persistence
All your system changes will (of course) be automatically saved directly on the USB stick.
Updates/upgrades
You do not have to take any action in order to keep your system up to date. Chromium OS will itself check for updates each time it is launched and automatically install them.
Enable Spotify
Flash has to be installed. Do it like this. Leave the Chromium OS Desktop by pressing the keys Ctrl Alt F2 simultaneously. Log in as user chronos with password exton. Become root with sudo su (password exton). The run the following (magic) command: curl -L http://www.brash.ca/flash.sh | bash
It will look like this – screenshot 1 and this – screenshot 2.
Netflix
Unfortunately you can’t run Netflix in the Chromium Browser. Silverlight/Widevine is impossible to install for many reasons.
Screenshots when Chromium OS is running
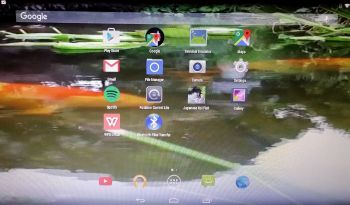
Showing installed apps – screenshot 3. As you can see it shows a lot of Android apps installed by me on my Android mobile phone using the same Gmail address as the one I’ve used to log in to Chromium in Chromium OS (ChromX). Even Google Play Store is there. All apps (for example Google Maps) work, but you can’t install new apps using Google Play Store.
Spotify is running – screenshot 4
Chromium OS GNU GENERAL PUBLIC LICENSE
DOWNLOAD
This build of ChromX has been replaced by Build 170212


